
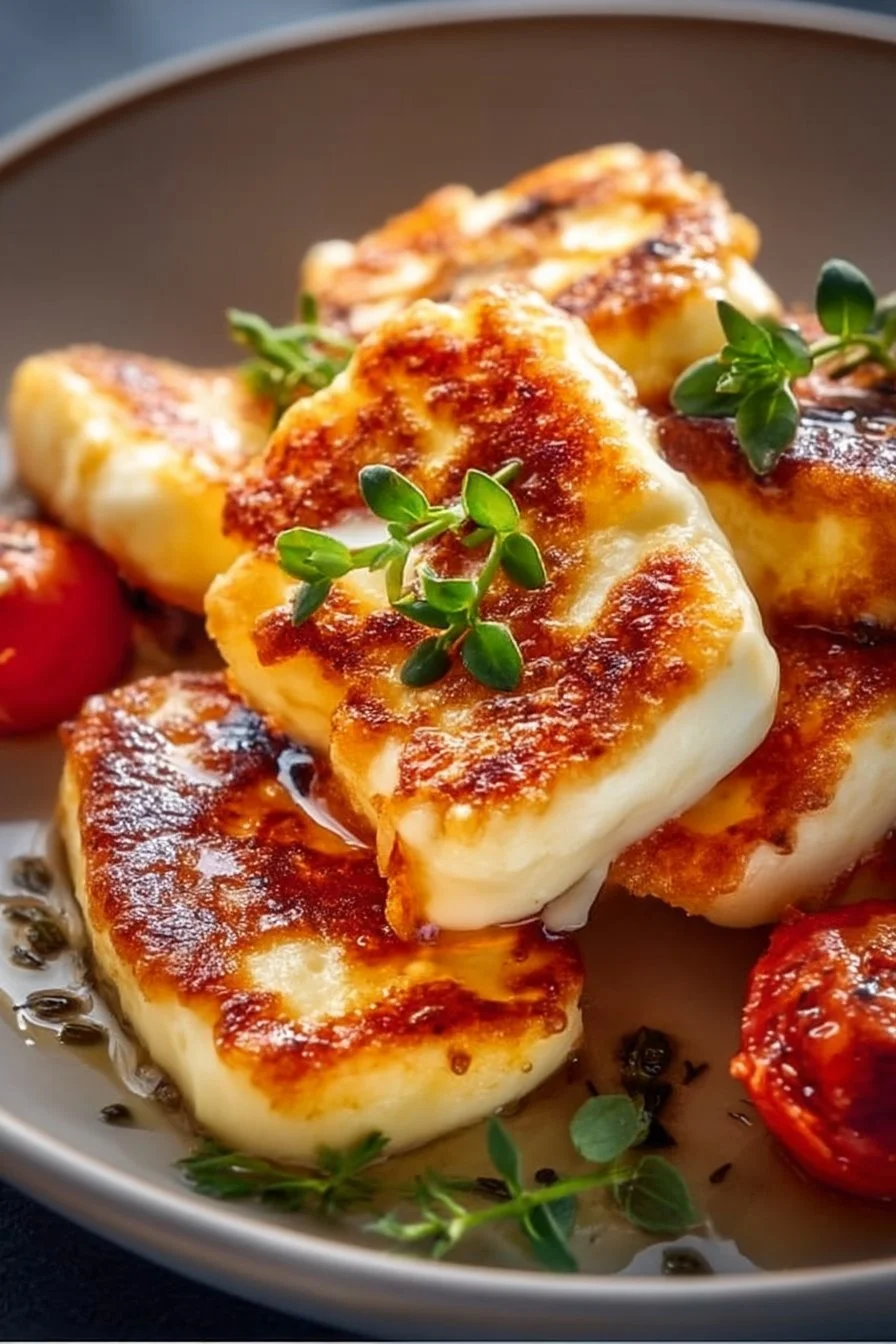
I reach for this simple air fryer halloumi on busy weeknights because it delivers crunchy, golden edges and a slightly squeaky, creamy interior in under 10 minutes. The seasoning is straightforward — olive oil, paprika, garlic powder, salt and pepper — so the cheese’s natural saltiness and texture are the stars, and cleanup is basically the basket and a bowl.
If you want a quick, reliable way to add a salty, crisp component to a salad, sandwich, or snack plate, this is it. For a deeper look at timing and variations I often use, check out my air fryer halloumi guide for more photo notes and pairing ideas.
Why This Air Fryer Recipe Works
- Air frying concentrates heat on the surface, which makes halloumi develop crisp, golden edges while the middle stays tender and slightly springy.
- The olive oil plus paprika and garlic powder create an even, lightly spiced coating that browns without burning.
- Total active time is minimal: a quick slice, a toss, and 8–10 minutes in the basket — great for weeknights or last-minute snacks.
- Single-layer cooking prevents steaming and keeps each slice crisp; the recipe’s flip-at-halfway ensures both sides brown evenly.
- Cleanup is fast — one bowl for tossing and one basket to wipe — so it’s easy to make regularly.
The Story Behind This Recipe
I make this when I want a fast, flavorful cheese component that doesn’t melt into puddles — halloumi’s texture holds up in the air fryer and browns like a champ without fuss.
What It Tastes Like
You get a salty, slightly smoky bite from the paprika with a noticeable contrast between a thin crisp exterior and a firm, squeaky interior. The garlic powder and black pepper lift the aroma during cooking, and the olive oil helps develop a glossy, golden finish that makes each slice feel substantial rather than greasy.
Ingredients You’ll Need
These ingredients are chosen to promote browning, flavor, and texture — the oil encourages even crusting, paprika adds color and mild smokiness, and the salt balances halloumi’s natural saltiness.
- Halloumi cheese
- Olive oil
- Paprika
- Garlic powder
- Black pepper
- Salt
For other compact, low-ingredient air fryer ideas that pair well with this, see some low-carb air fryer recipes that I often turn to.
How to Make Air Fryer Halloumi
- Preheat the air fryer to 375°F (190°C). A preheated basket gives you immediate, even browning when the slices hit the hot air.
- Cut the halloumi into thick slices about 1/3 to 1/2 inch thick so each piece keeps a tender center while the edges crisp.
- In a medium bowl, toss the halloumi slices with enough olive oil to coat them lightly, then sprinkle paprika, garlic powder, black pepper, and a little salt. Toss until each slice has a thin, even sheen — not dripping in oil.
- Arrange the slices in a single layer in the air fryer basket with space between them. Crowding traps steam and prevents those golden edges from forming.
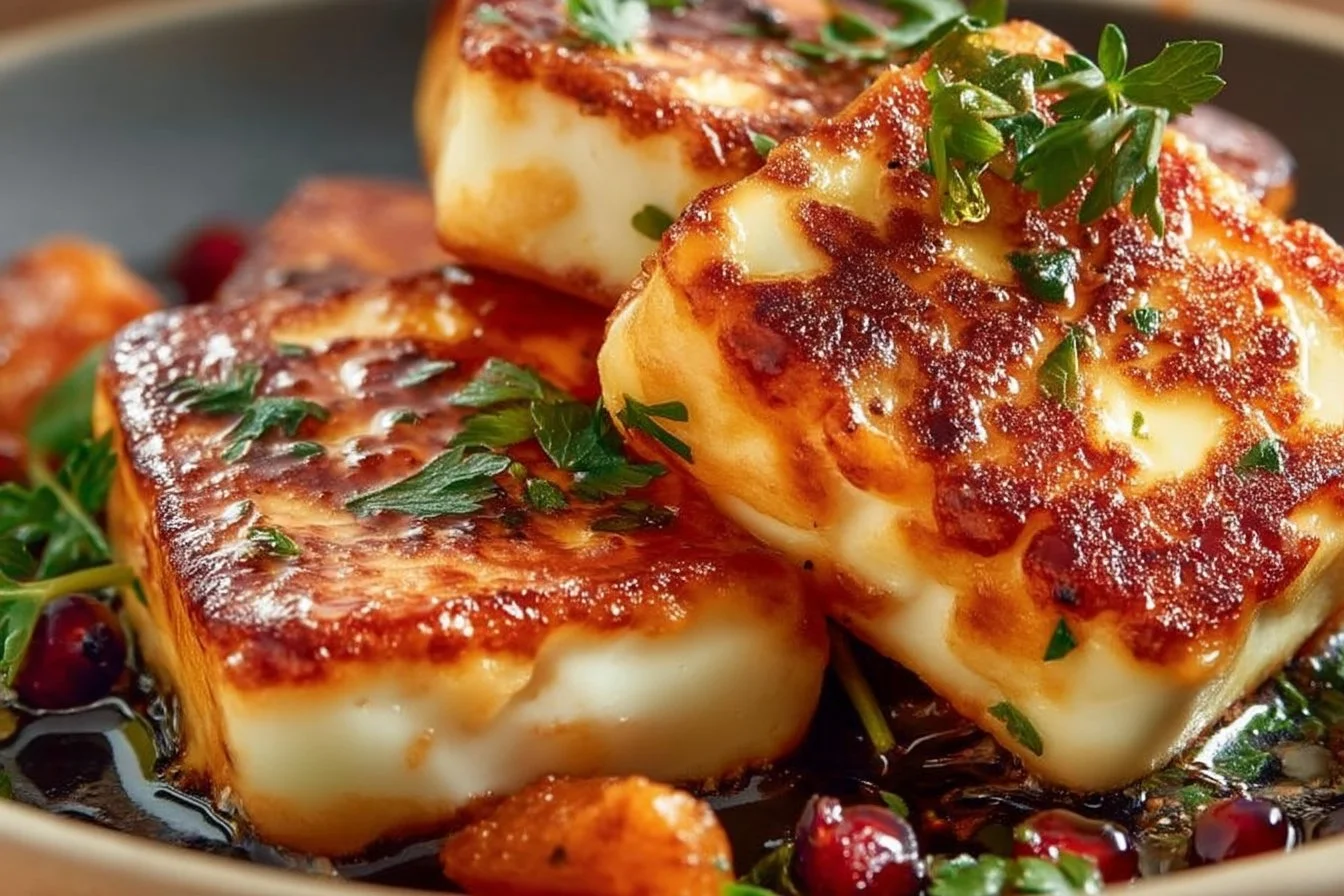
- Air fry for 8–10 minutes, flipping once halfway through. Look for golden-brown edges and a puffed, glossy surface; that visual is your “done” cue. If the edges are deeply browned before the time is up, the slices are ready.
- Serve hot. The halloumi is at its best straight from the basket while the exterior is crisp and the interior is still springy.
For more no-fuss methods like this one, I keep a list of easy air fryer recipes that follow the same simple setup.
Air Fryer Tips for Best Results
- Don’t skip the single layer: each slice needs air circulation to brown. If necessary, cook in batches rather than overlapping.
- Use just enough oil to coat the surface — it helps the paprika and garlic brown without making the basket greasy.
- Flip once only: that steady contact time on each side is what produces even crust without overbrowning.
- Watch the 8–10 minute window closely the first time in your machine; different baskets can brown at slightly different rates.
- Let the basket cool briefly between batches if you’re cooking a lot; very hot baskets can brown the second batch faster. For ideas on pairing it with greens and sides, check my round-up of air fryer vegetable sides.
Variations and Add-Ons
- Use smoked paprika instead of regular paprika for a deeper, woodsy note.
- Increase the garlic powder a touch and add extra black pepper if you want more bite.
- Finish with a squeeze of lemon or pair with a simple yogurt dip (if you like tang) — the crisped surface holds a drizzle or dip without getting soggy.
Serving Ideas
- Layer slices on top of a green salad — the crisp cheese makes a salad feel like a meal.
- Slide into a flatbread or pita with tomatoes and greens for a quick sandwich.
- Serve as a snack with toothpicks alongside olives and raw vegetables for contrast. For small brunch plates, arrange several hot slices next to roasted tomatoes and toasted bread; the contrast in textures is immediate and satisfying. If you want breakfast ideas that use the air fryer, I’ve collected a few favorites that work well with halloumi.
Storage and Reheating
- Fridge: Store cooled halloumi in an airtight container for up to 3 days. The exterior will soften in the fridge but reheating restores some crispness.
- Freezer: Not ideal — freezing changes the cheese’s texture. I don’t recommend it for best results.
- Reheating: Reheat briefly in the air fryer until the outside crisps again; this is the best way to recover the original texture. Avoid microwaving if you care about crispness.
FAQs
Q: Can I make this in batches?
A: Yes — cook in single layers and run consecutive batches. Expect later batches to brown a touch faster if the basket is very hot.
Q: Do I need to preheat the air fryer?
A: Yes. Preheating to 375°F ensures the slices start browning immediately and don’t sit in lower heat where they might soften instead of crisp.
Q: How can I keep the halloumi from getting soggy?
A: Avoid crowding the basket and use only a light coating of oil so moisture can evaporate and the surface can brown.
Q: What does “done” look like?
A: Look for glossy, golden-brown edges and a slightly puffed surface; the center should still be firm and springy, not collapsed.
Q: Can I prep the slices ahead?
A: You can slice and season the halloumi ahead of time and refrigerate briefly, but cook from chilled rather than frozen for best browning.
Recipe Recap
This is a fast, no-fuss air fryer halloumi that crisps up in 8–10 minutes at 375°F. The method highlights golden, slightly puffed edges and a firm, squeaky interior, making it perfect as a snack, salad topper, or sandwich filling.
Final Thoughts
This recipe is one of my go-tos when I want big flavor with minimal effort. It’s forgiving, quick, and reliably produces that satisfying contrast between a crisp exterior and a springy center — give it a try and you’ll see why halloumi works so well in the air fryer.
Conclusion
For other takes and additional inspiration for air fryer halloumi, check these recipes: Air Fryer Halloumi Cheese – Happy Veggie Kitchen, Air Fryer Halloumi Recipe – Allrecipes, and Crispy Air Fryer Halloumi Bites Recipe – Serious Eats.

Air Fryer Halloumi
Ingredients
Method
- Preheat the air fryer to 375°F (190°C).
- Cut the halloumi into thick slices about 1/3 to 1/2 inch thick.
- In a medium bowl, toss the halloumi slices with enough olive oil to coat them lightly.
- Sprinkle paprika, garlic powder, black pepper, and salt on the slices. Toss until evenly coated.
- Arrange the slices in a single layer in the air fryer basket, leaving space between them.
- Air fry for 8–10 minutes, flipping once halfway through, or until golden-brown edges form.
- Serve hot, enjoy the crispy exterior and springy interior.