
The Practical Why Behind Cottage Cheese Wraps
I love recipes that solve a real Tuesday problem, you know, the one where you need lunch and your brain has already clocked out. Cottage Cheese Wraps do that for me because they bake hands off while I tidy the counters, pack a bag, or pretend I am going to fold laundry. The batter blends smooth in a minute, then the oven does the heavy lifting, no skillet babysitting, no flipping drama. You get a soft, flexible wrap that holds up to fillings without tearing, as long as you spread the batter evenly and let it cool fully before peeling. That cooling step feels fussy, but it turns a delicate sheet into a sturdy wrap you can actually roll.
From a health and meal prep angle, Cottage Cheese Wraps hit the sweet spot for low carb comfort without tasting like a compromise. Cottage cheese and eggs bring protein and staying power, Parmesan adds savory depth, and the seasonings keep it from tasting like, well, breakfast in disguise. I make a double batch, then stash the wraps between pieces of parchment in the fridge so I can grab one and go. If you manage blood sugar, this swap can feel like a small victory, you still get the wrap experience, just with fewer carbs and more satiety. For more easy protein ideas, you can pair this with my [keto egg salad] or tuck it around my [low carb chicken salad] for a lunch that actually keeps you full.
Practically speaking, this recipe also forgives real life kitchens. If your cottage cheese looks watery, blot it lightly with a paper towel or add 1 tablespoon more Parmesan, that helps the wrap bake up less fragile. If the center stays soft, you likely spread it too thick, next time use a larger sheet pan and push the batter into a thin, even rectangle with a silicone spatula. When you fill Cottage Cheese Wraps, think in layers, start with a dry base like lettuce or sliced turkey, then add wetter ingredients like tomatoes or salsa so the wrap stays springy. And if one cracks, do what my grandmother did, call it rustic, overlap the edges, and keep rolling.
Baking Method for Cottage Cheese Wraps
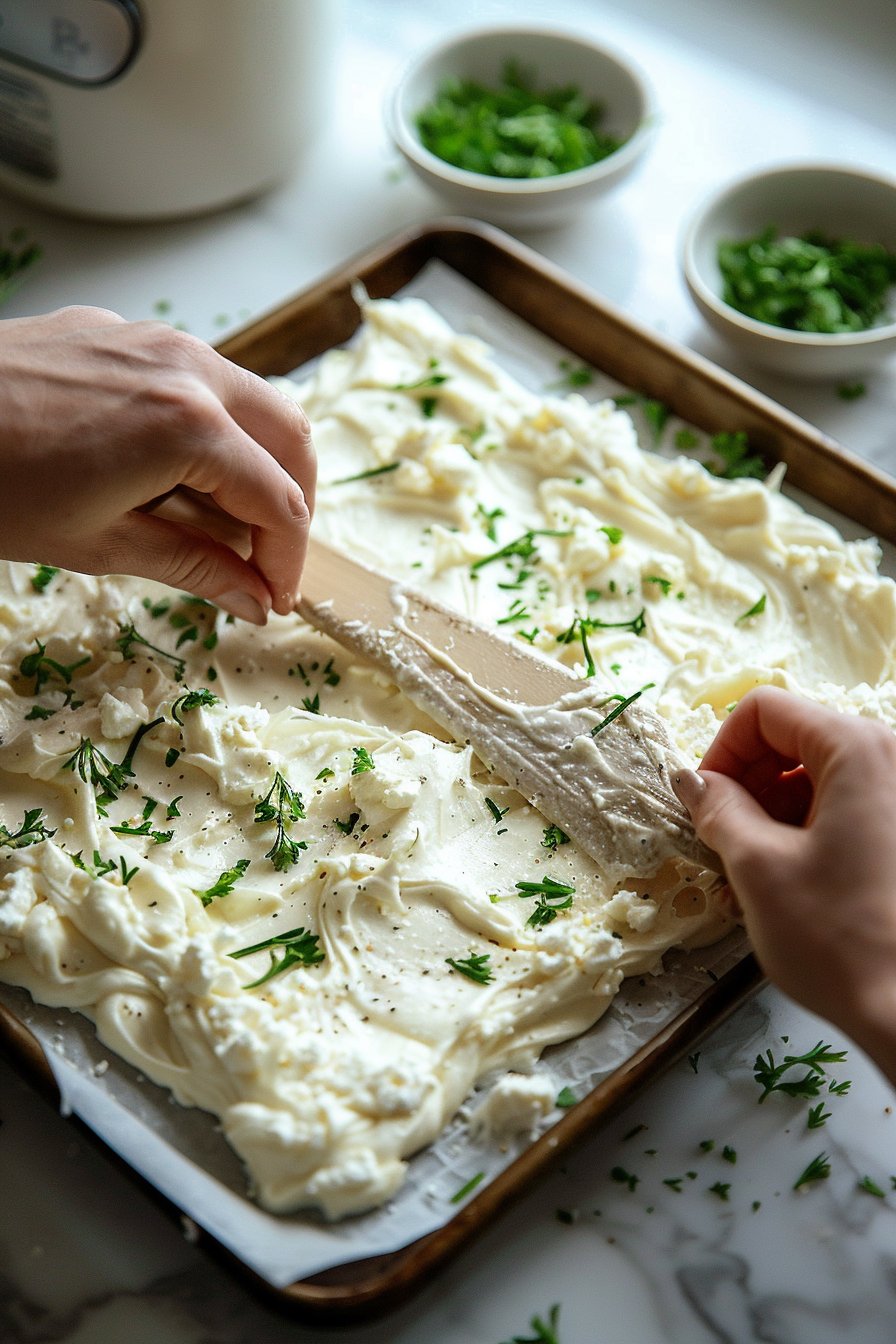
Heat your oven to 350°F, then line a large baking sheet with parchment paper, not foil, because foil grabs on like a toddler with a new sticker book. Add the cottage cheese, eggs, Parmesan, garlic powder, and Italian seasoning to a blender or food processor, then blend for about 1 minute until the batter looks silky and pourable. You want it smooth enough that you do not see curds, or you will get little weak spots that tear when you roll. Pour the batter onto the parchment, then use a silicone spatula to spread it into a thin rectangle, about 1/8 inch thick, with squared off corners. Take a moment to push batter into any bare patches, since gaps turn into crispy holes, and not the cute kind.
Bake on the center rack for 30 to 35 minutes, until the top looks dry, set, and lightly golden, especially around the edges. If your oven runs cool, give it a few extra minutes, you are looking for a wrap that lifts without sticking and does not feel jiggly in the middle. For extra even baking, rotate the pan once at about the 20 minute mark, since most ovens have a favorite hot spot. When the Cottage Cheese Wraps come out, let them cool completely on the pan, this step matters because the proteins finish setting as they cool. If you rush it, the wrap will feel tender but it will tear the second you try to peel it, and nobody needs that kind of drama at lunch.
Once fully cool, peel the Cottage Cheese Wraps off the parchment slowly, starting at a corner and keeping the wrap low and close to the paper as you lift. If it resists, pause and let it cool another 5 minutes, or slide a thin spatula under the tight spot, gentle wins here. Now you can cut it in half for two smaller wraps, or leave it whole for a big, satisfying roll up, I love it with a crunchy filling for contrast. For meal prep, stack with parchment between pieces and store chilled, then rewarm briefly to make the Cottage Cheese Wraps extra flexible before filling. If you want filling ideas, see my [Keto Chicken Salad] and [Low Carb Breakfast Burrito Bowl] posts.
Make Ahead and Storage for Cottage Cheese Wraps
I love making Cottage Cheese Wraps on Sunday when the kitchen already smells like garlic and Parmesan, then I coast through busy weekdays like I planned my life on purpose. Bake the wrap, then let it cool completely on the pan, this step keeps it flexible instead of tacky. Once cool, layer parchment between pieces, roll them loosely, and tuck them into an airtight container. Refrigerate for up to 4 days, and if you plan to fill them later, store them plain so the edges stay neat. For a grab and go option, pre portion your fillings separately, then assemble right before eating, it keeps everything from turning soggy.
For freezing, Cottage Cheese Wraps do best when you freeze them flat first, then stack with parchment and slide into a freezer bag. They keep well for up to 2 months, and they thaw fast in the fridge overnight or on the counter for about 20 minutes. Skip the microwave if you can, it tends to make the wrap sweaty and a little rubbery. If you want warmth, heat a dry nonstick skillet over medium for 30 to 45 seconds per side, just until pliable, or warm it in a 300°F oven for about 3 minutes. If you need more meal prep ideas, pair this with my Keto Egg Muffins or my Low Carb Chicken Salad for easy mix and match lunches.
Cottage Cheese Wraps variations and serving ideas
Once you have the basic Cottage Cheese Wraps down, you can nudge the flavor in a bunch of directions without messing with the texture. For a bolder savory wrap, add 1 to 2 teaspoons taco seasoning and a pinch of smoked paprika, then skip the Italian seasoning, it turns into a perfect base for fajita style fillings. If you want a garden fresh vibe, blend in 1 tablespoon chopped chives or dill, then sprinkle a little extra Parmesan over the top before baking for a crisp edge. For a little heat, add 1 to 2 teaspoons hot sauce to the batter, or fold in a pinch of red pepper flakes after blending, just keep it modest so the wrap still sets. If your Cottage Cheese Wraps come out a touch softer than you like, bake 3 to 5 minutes longer and let them cool fully, cooling is where the magic happens.
To serve, treat Cottage Cheese Wraps like a flexible tortilla that actually keeps you full. For breakfast, spread on mashed avocado, add scrambled eggs, and tuck in a few slices of turkey, then roll tight and toast in a dry skillet for 1 to 2 minutes per side for a golden finish. For lunch meal prep, fill with chicken salad, crunchy cucumber, and baby spinach, then wrap in parchment and chill, it holds up well without getting soggy. For a quick dinner, go pizza style, spread a thin layer of sugar free marinara, add mozzarella and halal beef sausage slices, then broil just until bubbly, you can find more low carb comfort ideas in my [Keto Pizza Bowl] and [Low Carb Chicken Salad]. If you need a diabetic friendly plate, pair Cottage Cheese Wraps with a big lemony salad or roasted broccoli, and keep fillings protein forward, your wrap will do the heavy lifting so you do not have to.
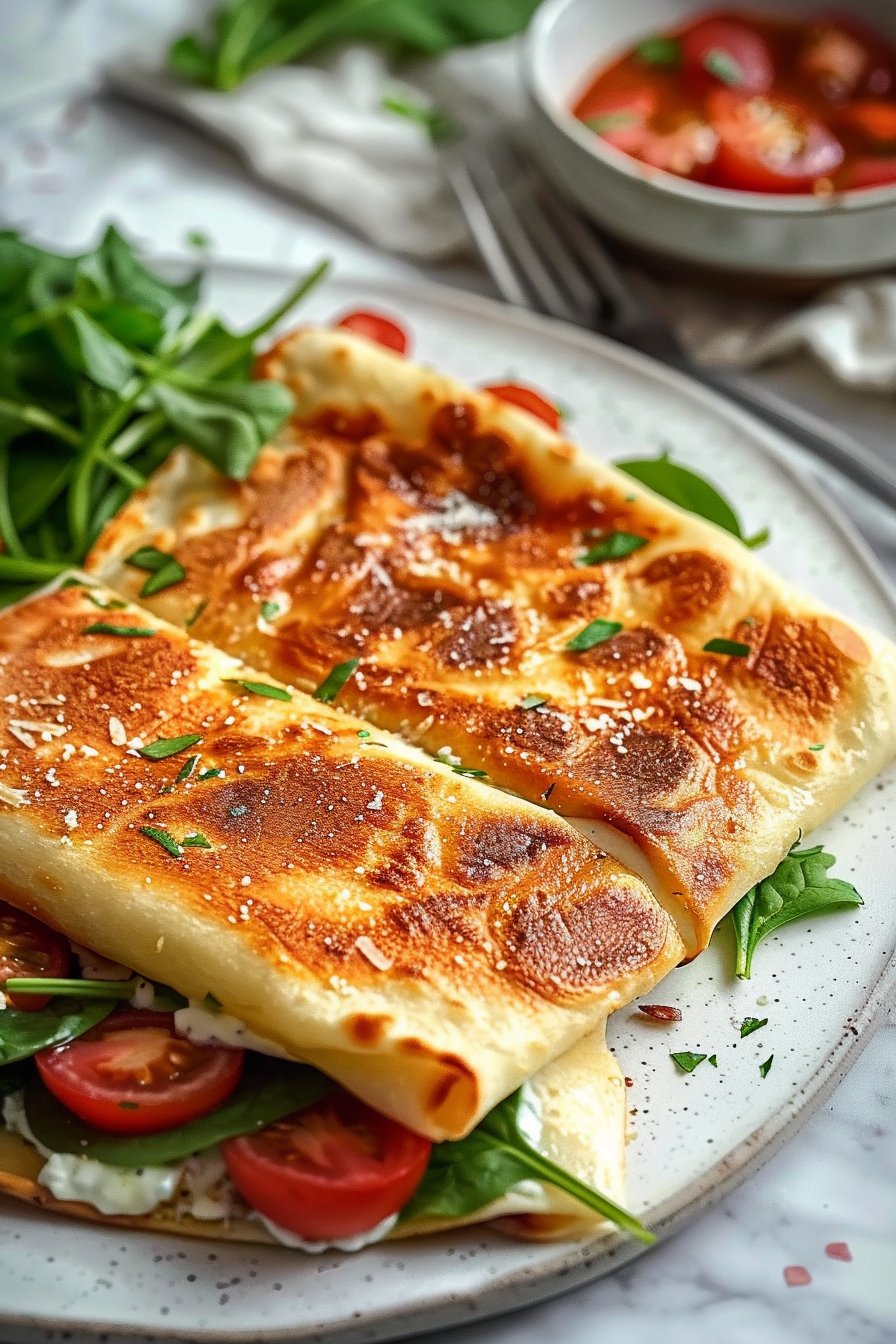
Serving of Cottage Cheese Wraps
Conclusion
If your weeknight dinners ever feel like a tired rerun, these Cottage Cheese Wraps can bring the spark back fast. I love how something so simple turns into a warm, flexible wrap with that lightly golden edge and a cozy, savory bite. You get the comfort of a handheld meal, plus the kind of protein boost that keeps you satisfied without weighing you down. And if your first one comes out a little rustic, welcome to my kitchen. Rustic still tastes wonderful.
This recipe also has a sweet way of gathering people. I have watched picky eaters turn into enthusiastic helpers the moment the pan hits the counter, everyone hovering and calling dibs on the first wrap. Set out a few fillings and let folks build their own, and suddenly it feels like a little dinner party, even on a random Tuesday. Give it a try this week, play with your favorite add ins, and make it yours. For more delicious recipes like this, follow us on Facebook and Pinterest!
Instructions Process of Cottage Cheese Wraps
Recipe

Cottage Cheese Wraps
Ingredients
Method
- Preheat the oven to 350°F and line a large baking sheet with parchment paper.
- Add cottage cheese, eggs, Parmesan, garlic powder, and Italian seasoning to a blender or food processor and blend for 1 minute until silky smooth.
- Pour the batter onto the parchment and spread into a thin, even rectangle with a silicone spatula, filling any gaps.
- Bake on the center rack for 30 minutes until set and lightly golden; rotate the pan at 20 minutes for even baking.
- Cool completely on the pan, then peel the wrap off the parchment starting from a corner.
- Cut into 2 wraps, fill, roll, and serve.
Notes
- Let the wrap cool fully before peeling so it firms up and lifts cleanly.
- If cottage cheese looks watery, blot lightly with a paper towel or add 1 tbsp more Parmesan.
- Store wraps stacked with parchment between them in the refrigerator and rewarm briefly to make them more flexible.